How to Deploy App to Minikube Cluster using Deployment controller, Service, and Horizontal Pod Autoscaler
In this post, we are going to learn about how to deploy a containerized app into the Kubernetes (minikube) cluster, enable the horizontal autoscaling on it, and create a service that makes the application accessible from outside the cluster.
The application that we are going to use on the tutorial is a simple hello world app written in Go. The app is dockerized and the image is available on Docker Hub.
You can also use your own app, make sure it is pushed to Docker Hub.
1. Prerequisites
1.1. Docker engine
Ensure the Docker engine is running. If you haven't installed it, then do install it first.
1.2. Minikube
Ensure the Minikube is running. Run minikube start command on PowerShell (opened with an administrator privilege). If you haven't installed it, then do install it first.
1.3. Kubernetes CLI tool
Ensure the kubectl command is available. If you haven't installed it, then do install it first.
1.4. The hey tool (an HTTP load generator)
Install this tool in your local machine https://github.com/rakyll/hey. It's similar to the Apache Benchmark tool. We are going to use this to perform the stress test to our app to check whether the auto-scaling capability is working or not.
2. Preparation
2.1. For Windows user only, run PowerShell with admin privilege
CMD won't be helpful here. Run the PowerShell as an administrator.
2.2. Create the Kubernetes objects configuration file (in .yaml format)
We are going to create three Kubernetes objects: the deployment, horizontal pod auto scaler, and service. But to make things easier, we will do the creation by using the config file.
So the three objects mentioned above will be defined in a .yaml file. One object usually represented by one config file, however, in this tutorial, we will write all configs in a single file.
Now create a file called k8s.yaml (or use another name, it is fine). Open the file using your favorite editor. Next, we shall begin the config definition.
3. Object Definitions
3.1. Deployment Object
Deployment is a controller used to manage both pod and replica sets. In this section, we are going to create the object.
On the k8s.yaml, write the following config below. Each part of the script has some remark that explains what it does.
---
# there is a lot of APIs available in Kubernetes (try `kubectl api-versions` to see all of it).
# for this block of deployment code, we will use `apps/v1`.
apiVersion: apps/v1

# book this block of YAML for Deployment.
kind: Deployment

# name it `my-app-deployment`.
metadata:
  name: my-app-deployment

# specification of the desired behavior of the Deployment.
spec:

  # selector.matchLabels basically used to determine which pods are managed by the deployment.
  # this deployment will manage all pods that have labels matching the selector.
  selector:
    matchLabels:
      app: my-app

  # template describes the pods that will be created.
  template:

    # put a label on the pods as `my-app`.
    metadata:
      labels:
        app: my-app

    # specification of the desired behavior of the `my-app` pod.
    spec:

      # list of containers belonging to the `my-app` pod.
      containers:

          # allocate a container, name it as `hello-world`.
        - name: hello-world

          # the container image is on docker hub repo `novalagung/hello-world`.
          # if the particular image is not available locally, then it'll be pulled first.
          image: novalagung/hello-world

          # set the env vars during container build process.
          # for more details take a look at
          # https://hub.docker.com/repository/docker/novalagung/hello-world.
          env:
            - name: PORT
              value: "8081"
            - name: INSTANCE_ID
              valueFrom:
                fieldRef:
                  fieldPath: metadata.name

          # this pod only have one container (`hello-world`),
          # and what this container does is start a webserver that listens to port `8081`.
          # the port need to be exposed,
          # to make it accessible between the pods within the cluster.
          ports:
            - containerPort: 8081

          # compute resources required by this container `hello-world`.
          resources:
            limits:
              cpu: 250m
              memory: 32Mi
In summary, the above deployment config will do these things:
- Create a deployment object called
my-app-deployment. - The pod spec (within deployment object) defined with only one container.
- The container is
hello-worldand the image will be pulled from Docker Hub. - During the container build, port and instance ID specified. The port specifically used by the webserver within the container.
- The web server listens to the port
8081and it is exposed. Meaning we will be able to access the web server from outside the particular port but within the cluster.
Now, apply the config using the command below.
# apply the config
kubectl apply -f k8s.yaml

# show all deployments
kubectl get deployments

# show all pods
kubectl get pods
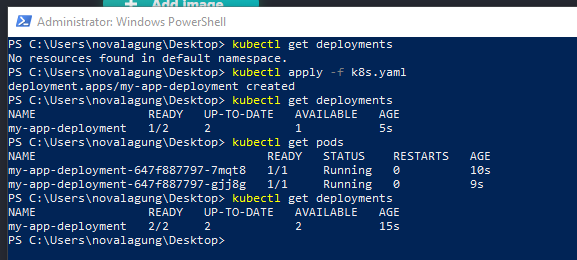
3.1. Testing one of the pod
As we can see from the image above, the deployment is working and two pods are currently running.
Two pods automatically created. This is because we don't specify the
spec.replicasvalue. If we specify some value like4, then there will be 4 pods running. The default replicas value is2.
Let's do some testing here. We will try to connect into one of the pods and then check whether the app is listening to port 8081 or not.
# show all pods
kubectl get pods

# connect to specific pod
kubectl exec -it <pod-name> -- /bin/sh

# check for app that listen to port 8081
netstat -tulpn | grep :8081

It's clear from the image above that the app is running on port 8081.
3.2. Apply changes on the deployment object
Other than deployment, there are some other controllers available in k8s. What makes deployment controller special is whenever there is a change happen in the pod config within deployment resource, when we apply it then the pods will be updated by the controller seamlessly.
Ok, now let's prove the above statement by doing some changes on the deployment config. Do the following changes:
- Change
containers.env.valueofPORTenv to8080. Previously it is8081. - Change
containers.ports.containerPortto8080. Previously it is8081.
Below is how the config will look like after the changes.
---
apiVersion: apps/v1
kind: Deployment
metadata:
  name: my-app-deployment
spec:
  selector:
    matchLabels:
      app: my-app
  template:
    metadata:
      labels:
        app: my-app
    spec:
      containers:
        - name: hello-world
          image: novalagung/hello-world
          env:
            - name: PORT
              value: "8080" # <--- change from 8081 to 8080
            - name: INSTANCE_ID
              valueFrom:
                fieldRef:
                  fieldPath: metadata.name
          ports:
            - containerPort: 8080 # <--- change from 8081 to 8080
          resources:
            limits:
              cpu: 250m
              memory: 32Mi
Next, re-apply this config.
# apply the config
kubectl apply -f k8s.yaml

# show all pods
kubectl get pods

# connect to specific pod
kubectl exec -it <pod-name> -- /bin/sh

# check for the app that listens to port 8080
netstat -tulpn | grep :8080
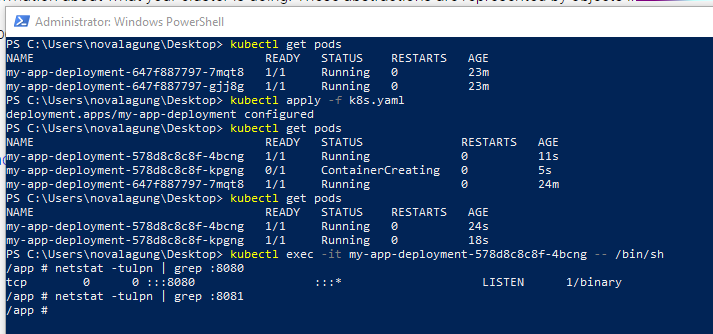
See, the changes that we made on the pod are applied in a controlled way. And the web server within the newly created pod is listening to port 8080. This is nice!
Tips! Use the command below to see the error log on certain pods. Probably useful is something wrong going on, like the webserver not starting, etc.
kubectl get podskubectl describe pod <pod-name>kubectl logs <pod-name>
3.2. Service Object
In this section, we are going to create a new service. This service shall enable access between pod within the cluster, and also enable access for incoming request from external into the cluster pod.
The
NodePortservice type can be used in our situation as well, not justLoadBalancertype
Let's append below config into the k8s.yaml file.
---
# pick API version `v1` for service.
apiVersion: v1

# book this block of YAML for Service.
kind: Service

# name it `my-service`.
metadata:
  name: my-service

# spec of the desired behavior of service.
spec:

  # pick LoadBalancer as the type of the service.
  # a LoadBalancer service is the standard way to expose a service to the internet.
  # this will spin up a Network Load Balancer that will give you a single IP address
  # that will forward all traffic to your service.
  #
  # on cloud provider this will generate an external IP for public access.
  # in local usage (e.g. minikube), the service will be accessible through minikube exposed IP.
  type: LoadBalancer

  # route service traffic to pods with label keys and values matching this selector.
  selector:
    app: my-app

  # the list of ports that are exposed by this service.
  ports:

      # expose the service to outside of cluster, make it publicily accessible
      # via external IP or via cluster public IP (e.g minikube IP) using nodePort below.
      #
      # to get the exposed URL (with IP): `minikube service my-service --url`.
      #   => http://<cluster-public-ip>:<nodePort>
    - nodePort: 32199

      # the incoming external request into nodePort will be directed towards port 80 of
      # this particular service, within the cluster.
      #
      # to get the exposed URL (with IP): `kubectl describe service my-service | findstr "IP"`.
      #   => http://<service-ip>:<port>
      port: 80

      # then from the service, it'll be directed to the available pods
      # (in round-robin style), to pod IP with port 8080.
      #   => http://<pod-ip>:<targetPort>
      targetPort: 8080
The LoadBalancer is chosen as the type of the service. Load balancer service will accept requests from <publicIP>:<nodePort> and direct it to port 80 in the service. And then the request on the port 80 will be directed to the <pod>:<targetPort> in round-robin style (since it's load balancer after all).
One important note here, since our cluster is within the Minikube environment, so the public IP here refers to the public IP of Minikube. To get the Minikube IP, use command below:
# show minikube public IP
minikube ip
Ok, let's apply our new k8s.yaml file and test the service.
# apply the config
kubectl apply -f k8s.yaml

# show all services
kubectl get services

# show all pods
kubectl get pods

# test app using curl
curl <minikubeIP>:<nodePort>
curl <minikubeIP>:32199
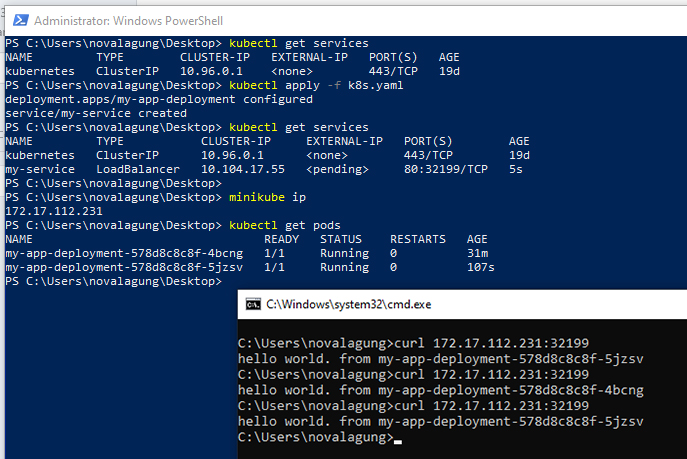
As we can see from the image above, we did dispatch multiple HTTP requests to the service. The result from the curl is different from one another, this is because the service will direct incoming request into available pods in round-robin style (like what load balancer usually do).
Tips! Rather than find the Service URL using
minikube ipand then concat it with node port from config, use command below:
minikube service <service-name> --urlminikube service my-service --url
3.3. Horizontal Pod Auto Scaler (HPA) Object
In this section, we are going to make our pods (within deployment object) scalable in an automated manner. So in case, there is a spike in the total number of users that currently accessing the app, then we shall not be worried.
One way to make the pod scaled automatically is by adding HPA or Horizontal Pod Auto Scaler. The Horizontal Pod Autoscaler automatically scales the number of pods in a replication controller, deployment, replica set or stateful set based on observed CPU utilization (or, with custom metrics support, on some other application-provided metrics).
Do append below configuration into k8s.yaml file.
---
# pick API version `autoscaling/v2beta2` for auto scaler.
apiVersion: autoscaling/v2beta2

# book this block of yaml for HPA (HorizontalPodAutoscaler).
kind: HorizontalPodAutoscaler

# name it `my-auto-scaler`.
metadata:
  name: my-auto-scaler

# spec of the desired behavior of the auto scaler.
spec:

  # min replica allowed.
  minReplicas: 3

  # max replica allowed.
  maxReplicas: 10

  # the deployment that will be scalled is `my-app-deployment`.
  scaleTargetRef:
    apiVersion: apps/v1
    kind: Deployment
    name: my-app-deployment

  # metrics contains the specifications for which to use to calculate the desired
  # replica count (the maximum replica count across all metrics).
  # the desired replica count is calculated multiplying the ratio between the
  # target value and the current value by the current number of pods.
  metrics:

      # resource refers to a resource metric known to Kubernetes describing each pod
      # in the current scale target (e.g. CPU or memory).
      # in below we define the scaling criteria as, if CPU utilization is changed between
      # the amount of 50% utilization, then scalling process shall happen.
    - type: Resource
      resource:
        name: cpu
        target:
          type: Utilization
          averageUtilization: 50
The remarks on each part of the config above are quite clear. In summary, an HPA will be created attached to my-app-deployment, numbers on the replication rules are defined, with scaling criteria is focusing on CPU utilization when average utilization is between 50%.
Ok now let's re-apply our HPA.
# apply the config
kubectl apply -f k8s.yaml

# show all HPA
kubectl get hpa

# show describe HPA
kubectl describe hpa <hpa-name>
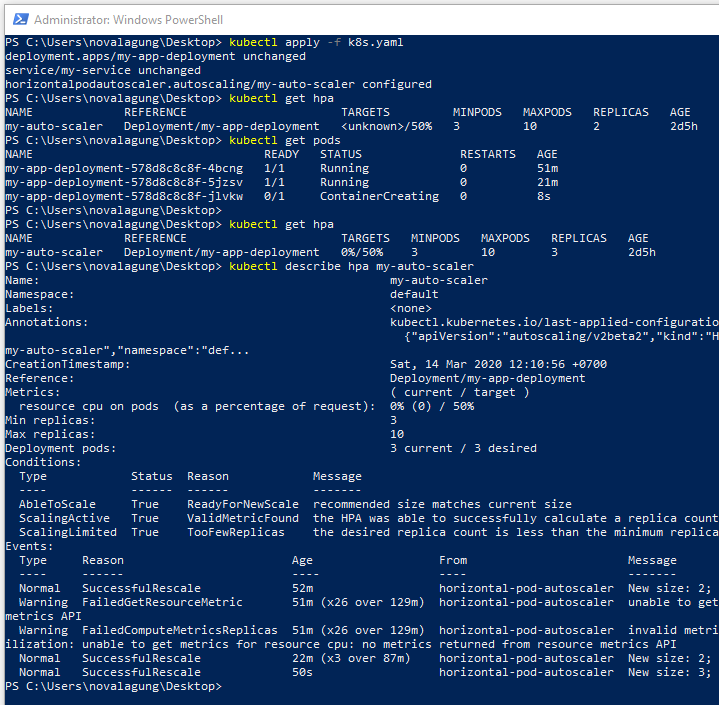
Previously we only have two pods running. After we apply the HPA, the new pod is created, so total there are three pods. This is because in our HPA the spec.minReplicas is set to 3.
3.3.1. Stress test on Horizontal Pod Auto scaler
Ok, next let's do some stress test! Let's see how the HPA will handle very high traffic coming. The below command will trigger a concurrent 50 request to the service URL for 5 minutes. Run it on a new CMD/PowerShell window.
# show service URL
minikube service my-service --url

# start the stress test
hey -c 50 -z 5m <service-URL>
And then back to our main PowerShell window, do regularly check the pods.
# show all HPA and pods
kubectl get hpa
kubectl get pods
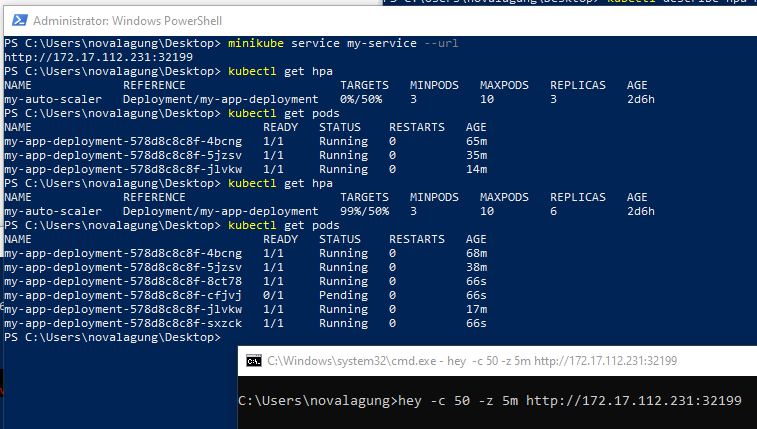
After a minute passed, suddenly a total of 6 pods created. This is happening because the CPU utilization is high enough, greater than the threshold that we defined in the config.
HPA is not only able to magically scale the pod during high traffic but on low traffic, the scaling process will happen as well. Do stop the stress test and wait for a few minutes, and check the HPA and pods again, you will see the number of pods reduced to spec.minReplicas again.
Ok, that's it.