How to Setup WireGuard VPN Server + UI
There are several ways to install WireGuard on linux-based server. Two of them are:
- using wireguard-install
- using linuxserver/wireguard Docker Image
We are going to learn both approaches in this post.
1. WireGuard in a nutshell
WireGuard is an open-source communication protocol that implements encrypted virtual private networks (VPNs) over UDP. It is very easy to use and secure. WireGuard aims to have better performance compared to IPSec and OpenVPN.
2. Client application
WireGuard supports many operating systems. Download the installer via the following link:
3. WireGuard server setup
◉ Using wireguard-install
The easiest way to install WireGuard server is via wireguard-install. They provide an executable shell script to automate the installation on some Linux Distro, such as:
- AlmaLinux
- Arch Linux system
- CentOS
- Debian
- Fedora
- Oracle
- Ubuntu
Ok, let us get to the point. To start the installation, run the following command:
curl -O https://raw.githubusercontent.com/angristan/wireguard-install/master/wireguard-install.sh
chmod +x wireguard-install.sh
./wireguard-install.sh
You will be asked to confirm several configurations key. The pre-defined value for each prompt should be sufficient, except for the IPv4 or IPv6 public address, for that specific prompt, ensure to have correct public IP address entered.
If you are using AWS or another cloud provider, there is a chance that the default IP address value is not the public IP, but the private IP. So please keep in mind, always use the public IP there.
Then the response below will appear:
Welcome to the WireGuard installer!
The git repository is available at: https://github.com/angristan/wireguard-install

I need to ask you a few questions before starting the setup.
You can keep the default options and just press enter if you are ok with them.

IPv4 or IPv6 public address: 11.234.5.181
Public interface: eth0
WireGuard interface name: wg0
Server WireGuard IPv4: 10.66.66.1
Server WireGuard IPv6: fd42:42:42::1
Server WireGuard port [1-65535]: 51820
First DNS resolver to use for the clients: 1.1.1.1
Second DNS resolver to use for the clients (optional): 1.0.0.1

Okay, that was all I needed. We are ready to setup your WireGuard server now.
You will be able to generate a client at the end of the installation.

Press any key to continue...
Press enter or any key to continue the installation process. Next, you will be prompted to enter the several configuration for the client.
Feel free to pick any name for Client name and let the other fields be filled with the predefined value.
Client configuration

The client name must consist of alphanumeric character(s).
It may also include underscores or dashes and can't exceed 15 chars.

Client name: noval
Client WireGuard IPv4: 10.66.66.2
Client WireGuard IPv6: fd42:42:42::2
Keep pressing enter until you see the output below. At this point, the setup is pretty much completed.
Here is your client config file as a QR Code:

...

Your client config file is in /home/ubuntu/wg0-client-noval.conf
If you want to add more clients, you simply need to run this script another time!

WireGuard is running.
You can check the status of WireGuard with: systemctl status wg-quick@wg0

If you don't have internet connectivity from your client, try to reboot the server.
From that output you can tell where the client config file is located, it is in /home/ubuntu/wg0-client-noval.conf. Save the content on that file somewhere, it will be used on the client side to connect to the WireGuard server.
For more details, see https://github.com/angristan/wireguard-install
◉ Using Docker linuxserver/wireguard
The first step is to install Docker engine. Then create the VPN server by starting a new container using linuxserver/wireguard:latest using the following command:
For plain Docker:
docker run -d \
  --name=wireguard \
  --cap-add=NET_ADMIN \
  --cap-add=SYS_MODULE \
  -e PUID=1000 \
  -e PGID=1000 \
  -e TZ=Asia/Jakarta \
  -e SERVERURL=123.456.78.9 \
  -e SERVERPORT=51820 \
  -e PEERS=1 \
  -e PEERDNS=1.1.1.1 \
  -e INTERNAL_SUBNET=10.13.13.0 \
  -e ALLOWEDIPS=0.0.0.0/0,::/0 \
  -e PERSISTENTKEEPALIVE_PEERS=all \
  -e LOG_CONFS=true \
  -p 51820:51820/udp \
  -v /home/ec2-user/workspace/wireguard/config:/config \
  -v /lib/modules:/lib/modules \
  --sysctl="net.ipv4.conf.all.src_valid_mark=1" \
  --restart unless-stopped \
  lscr.io/linuxserver/wireguard:latest
For
docker-compose:version: '3.7'
services:
wireguard:
image: lscr.io/linuxserver/wireguard:latest
container_name: wireguard
cap_add:
- NET_ADMIN
- SYS_MODULE
environment:
- PUID=1000
- PGID=1000
- TZ=Asia/Jakarta
- SERVERURL=123.456.78.9
- SERVERPORT=51820
- PEERS=1
- PEERDNS=1.1.1.1
- INTERNAL_SUBNET=10.13.13.0
- ALLOWEDIPS=0.0.0.0/0,::/0
- PERSISTENTKEEPALIVE_PEERS=all
- LOG_CONFS=true
volumes:
- /home/ec2-user/workspace/wireguard/config:/config
- /lib/modules:/lib/modules
ports:
- 51820:51820/udp
sysctls:
- net.ipv4.conf.all.src_valid_mark=1
restart: always
Ensure to adjust the value of env var below:
PUIDandPGID→ use commandid <your-linux-username>to get the correct numberTZ→ specify the timezone of your location. example:Asia/JakartaorEtc/UTCSERVERURL→ public IP of your linux instance
Not to forget, map the /config path within container to the correct path in host. In the example I use /home/ec2-user/workspace/wireguard/config:/config.
Create the container, wait for a few seconds, then check the container logs to see the result. Then go to the path where it's pointing to the /config. Go to the peers folder.
cd /home/ec2-user/workspace/wireguard/config
cd peer1
cat peer1.conf
Save the content on that peer1.conf file somewhere, it will be used on the client side to connect to the WireGuard server.
For more details, see https://github.com/linuxserver/docker-wireguard
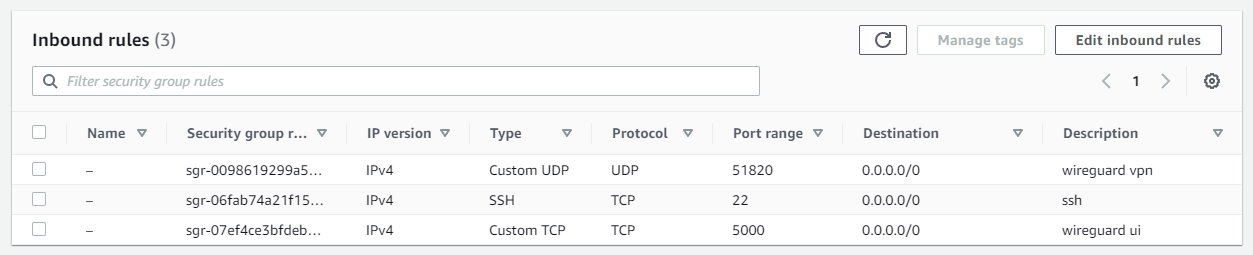
◉ Whitelist the UDP port
If you are using cloud provider such as AWS where by default not all ports are public, an additional is required, which is whitelisting the inbound traffic directed to the WireGuard port (in this example, it is 51820). Ensure to select the UDP protocol because WireGuard uses UDP.

4. Connect to WireGuard
The content of the .conf file is something like this:
[Interface]
PrivateKey = YDqQfiR6+VdaS3xqgSWW5CHAxhH0=
Address = 10.66.66.1/32,fd42:42:42::1/128
DNS = 1.1.1.1,1.0.0.1

[Peer]
PublicKey = ByhoL4uTt2QzQb3dsadwereQzQbufXw=
PresharedKey = aJDPFsuKvrE8TQM3RaQykrNP9os3ms=
Endpoint = 123.456.78.9:50194
AllowedIPs = 0.0.0.0/0,::/0
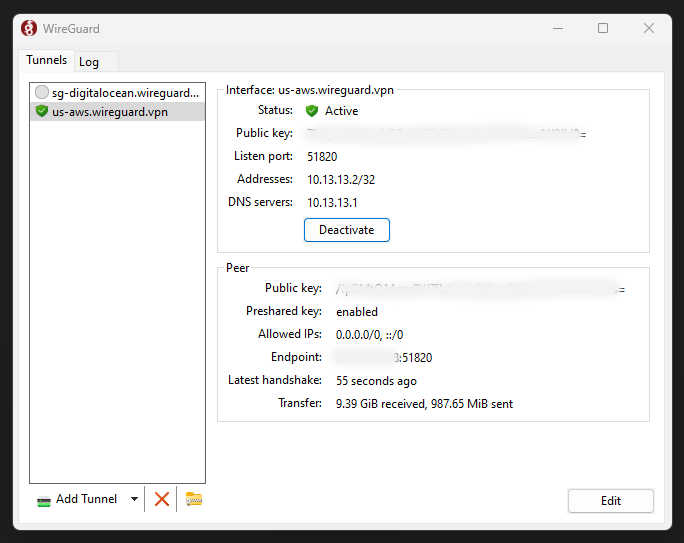
Now open up the WireGuard client application, click Add tunnel, then locate the .conf file. Next, click activate to start the VPN peering connection.
5. Set Up WireGuard UI
WireGuard UI is useful tools to manage your WireGuard server via friendly user interface. Such as adding user, adding new client, and other type of actions can be done in interactive manner via WireGuard UI.
If you use linuxserver/wireguard Docker image on your end, add the ngoduykhanh/wireguard-ui image to docker-compose.yml, so the content of that file would be like this:
version: '3.7'

services:
  wireguard:
    image: lscr.io/linuxserver/wireguard:latest
    container_name: wireguard
    cap_add:
      - NET_ADMIN
      - SYS_MODULE
    environment:
      - PUID=1000
      - PGID=1000
      - TZ=Asia/Jakarta
      - SERVERURL=123.456.78.9
      - SERVERPORT=51820
      - PEERS=1
      - PEERDNS=1.1.1.1
      - INTERNAL_SUBNET=10.13.13.0
      - ALLOWEDIPS=0.0.0.0/0,::/0
      - PERSISTENTKEEPALIVE_PEERS=all
      - LOG_CONFS=true
    volumes:
      - /home/ec2-user/workspace/wireguard/config:/config
      - /lib/modules:/lib/modules
    ports:
      - 5000:5000 # ← whitelist port 5000 for WireGuard UI
      - 51820:51820/udp
    sysctls:
      - net.ipv4.conf.all.src_valid_mark=1
    restart: always

  wireguard-ui:
    image: ngoduykhanh/wireguard-ui:latest
    container_name: wireguard-ui
    depends_on:
      - wireguard
    cap_add:
      - NET_ADMIN
    network_mode: service:wireguard
    environment:
      - SENDGRID_API_KEY
      - EMAIL_FROM_ADDRESS
      - EMAIL_FROM_NAME
      - SESSION_SECRET
      - WGUI_USERNAME=admin
      - WGUI_PASSWORD=admin
      - WG_CONF_TEMPLATE
      - WGUI_MANAGE_START=true
      - WGUI_MANAGE_RESTART=true
    logging:
      driver: json-file
      options:
        max-size: 50m
    volumes:
      - /home/ec2-user/workspace/wireguard/config:/etc/wireguard
      - /home/ec2-user/workspace/wireguard/db:/app/db
Re-run the docker-compose up -d command, and then access the UI via http://yourip:5000. You also need to whitelist the inbound access for port 5000.
By default, both username and password is set to admin. Right after you logged in to the dashboard, do immediately change the password for safety reason. To do that, click User Settings → Edit → Enter your new password → Save.
To create a new client/tunnel access, click the Wireguard Clients → New Client → Fill the info → Submit.
